SmartSend

The first field you’ll need to fill out is the “From” field. The "From field" specifies who the email is from. By default, this field will display the name associated with the account you are logged into. However, it is possible to replace the name with something else. Please note that your message history will still reflect the original account name.
The second field you'll need to fill out is the “Email” field. Just like before, this field defaults to the email address associated with the account you are logged into but can be replaced if necessary.
If you don't want to make your email address public, you can check the box next to the "Email" field labeled "Hide my email". When active, this setting will replace your email address with "DoNotReply" after you send an email.
Next, you'll need to decide who you are sending your email to. The first way to add recipients is by selecting a group from the Group menu. There are several built-in groups such as "All Active Staff", but you can build your own groups using the Group Builder. Please note that if you select a class using the Group selector, SmartSend will send the email to all classes with that Class Title. This is why Gradelink recommends making Class Titles unique whenever possible.
Sometimes, you may want to send a message to most but not all of the members of a group; that's when you'll want to use the "Exclude" menu. This menu allows you to exclude members of a particular group from receiving messages, such as when one of your staff members is on leave.
You can also manually add recipients using the Quick Add field. You can search by their last name or by email address. Also note that whenever you add a recipient or exclude a member of a group, you'll see red and green labels below that help visually represent who the email is and is not being sent to.

When sending to Active Students or a named student ("Chloe Price") the email will be sent just to the student's own personal and school addresses for their account. When sending to Active Parents or a named student's parents ("Chloe Price's parents") the email will be sent only to the parent email addresses for their account.  When sending to Staff members, the email will be sent to all associated emails (school, personal, etc) listed on their account.  |
Now that we know who the email is from and who it is being sent to, it's time to actually write the email.

The “Subject” field should be self-explanatory.
Likewise, the "Message" field is where you'll compose that actual text of the email. Gradelink's text editor is robust and even allows you to embed images directly in the email.
Below the “Message” field is the “Attachment” field, where you can attach files to your email. SmartSend accepts many common file types, but the size of your attachments must be less than 10 megabytes total.
SmartSend accepts the following file types: .ppt / .pptx / .xls / .xlsx / .csv / .doc / .docx / .pdf / .rtf / .txt / .m4v / .zip / .psd / .pub / .ai / .indd / .html / .htm / .wps / .eps / .key / .keynote / .pages / .numbers / .mov / .wav / .aif / .aiff / .mp4 / .mp3
If you finish composing your message but aren't ready to send it quite yet, you can hit “Save Draft” to save the current version of the email as a draft. Drafts are stored indefinitely and can be worked on or sent at your discretion.
If you're ready to send your message, go ahead and hit "Send Now". A window will pop up asking whether you'd like to send the message to additional recipients or if you're finished.

That's it! You've successfully sent an email using SmartSend.
SmartSend Pro - Scheduling an Email
SmartSend Pro users will see an additional button at the bottom of the page labeled “Schedule” which allows them to schedule their email in advance.

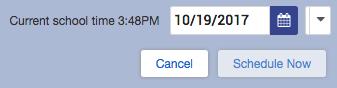
- “Current School Time” simply displays what time it is at your school.
- The “Calendar” is a dropdown menu that allows you to select what day you’d like your message to be sent
- The “Time” menu lets you select the time of day your message will be sent.
SmartSend Pro also gives users the ability to review sent or scheduled messages in the "Activity" tab at the top left of the page.

Message History is listed in descending order with the most recently sent message at the top of the page. Selecting a particular entry will allow you to view details about the email as well as the actual message that was sent. The table of entries can also be sorted by clicking on any of the column headings, or by entering text in the search fields directly below them.