For Gradelink's financial payments, welcome to AutoPost. The process of posting payments to student ledgers is now much quicker and simpler thanks to this upgrade to Gradelink Financial.
AutoPost works in conjunction with Gradelink Financial to keep track of your student accounts receivable. Your school also needs an account with PaySimple, Gradelink’s partner in processing payments. To get started with Gradelink Financial or PaySimple, please contact Gradelink Support.
To begin, click the Payments sub-tab at the top center of your screen. In the upper left corner, click the AutoPost Payments button.
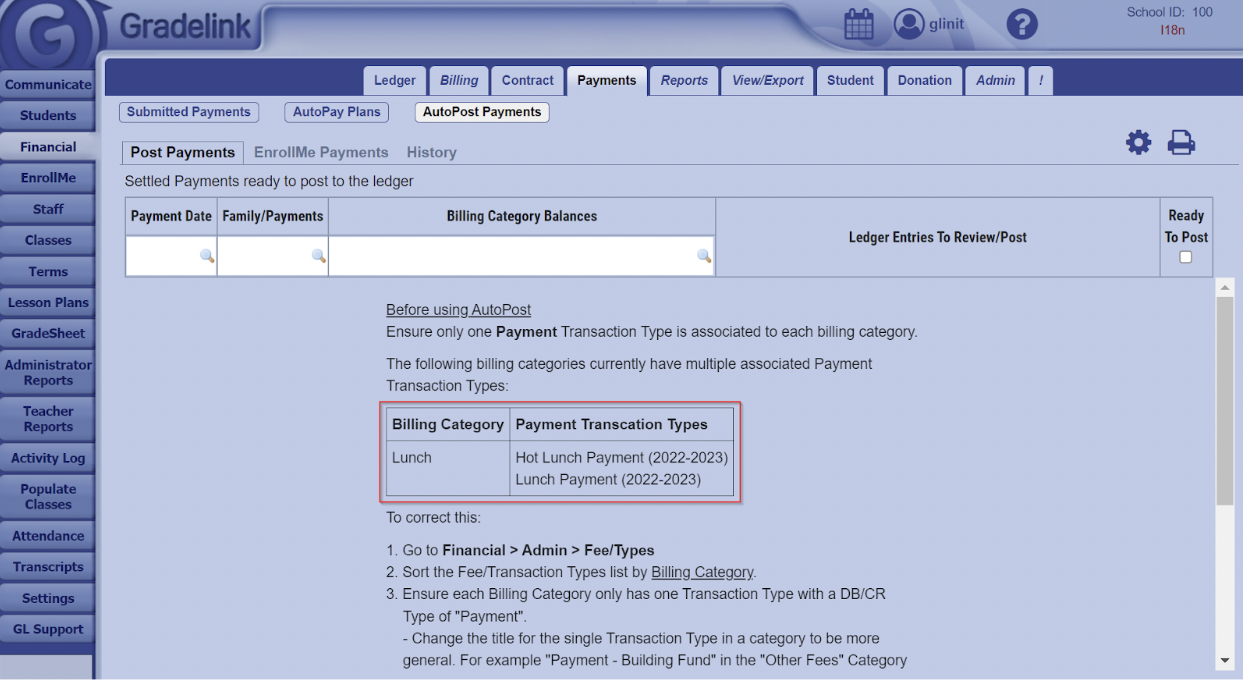
AutoPost allows only one associated Payment Fee Type for each billing category. If a billing category has more than one payment type associated, a message will appear showing the cases where multiple Billing Fee Types are associated with a billing category. To be clear, a single billing category can have multiple Charge Fee Types connected with it, but only one Payment Fee Type.
To correct this issue, you can either add more billing categories or combine multiple payment charge types into one billing category. To set up additional billing categories use this link for instructions on setting up billing categories:
https://gradelink.freshdesk.com/en/support/solutions/articles/6000019400-billing-categories
If you use “Financial Aid” billing categories to record tuition credit memos, it might be more efficient to associate such fee types with the Tuition billing category.
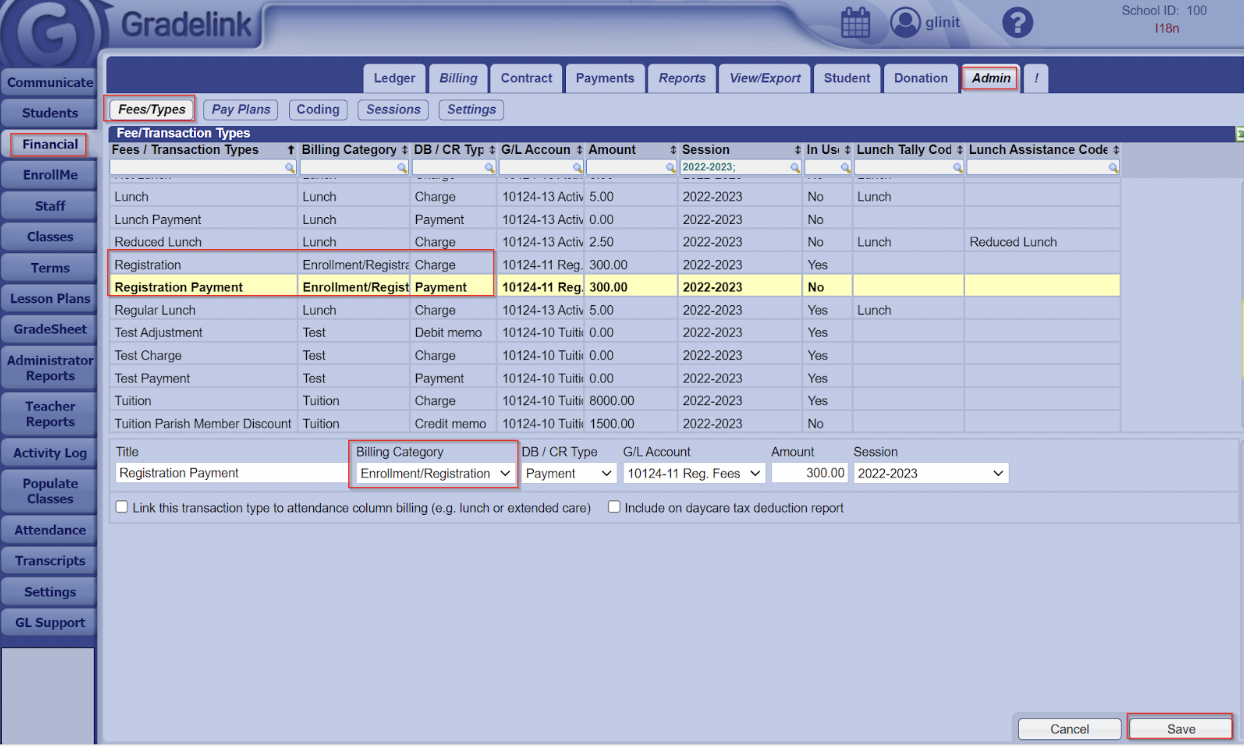
Once you have created the billing categories, go to Financial > Admin > Fees/Types. Click the payment type to be changed. Change the billing category and click the Save button. Do the same for the charge type.

Additionally, you can combine several Payment Types into one. Most of the time, combining Billing Fee Types is the best course of action. If you have a lot of existing ledger entries associated to billing categories that you need to merge, please contact Gradelink Support. We have tools to help with this process.
In Autopost, click the Settings icon in the upper right corner.

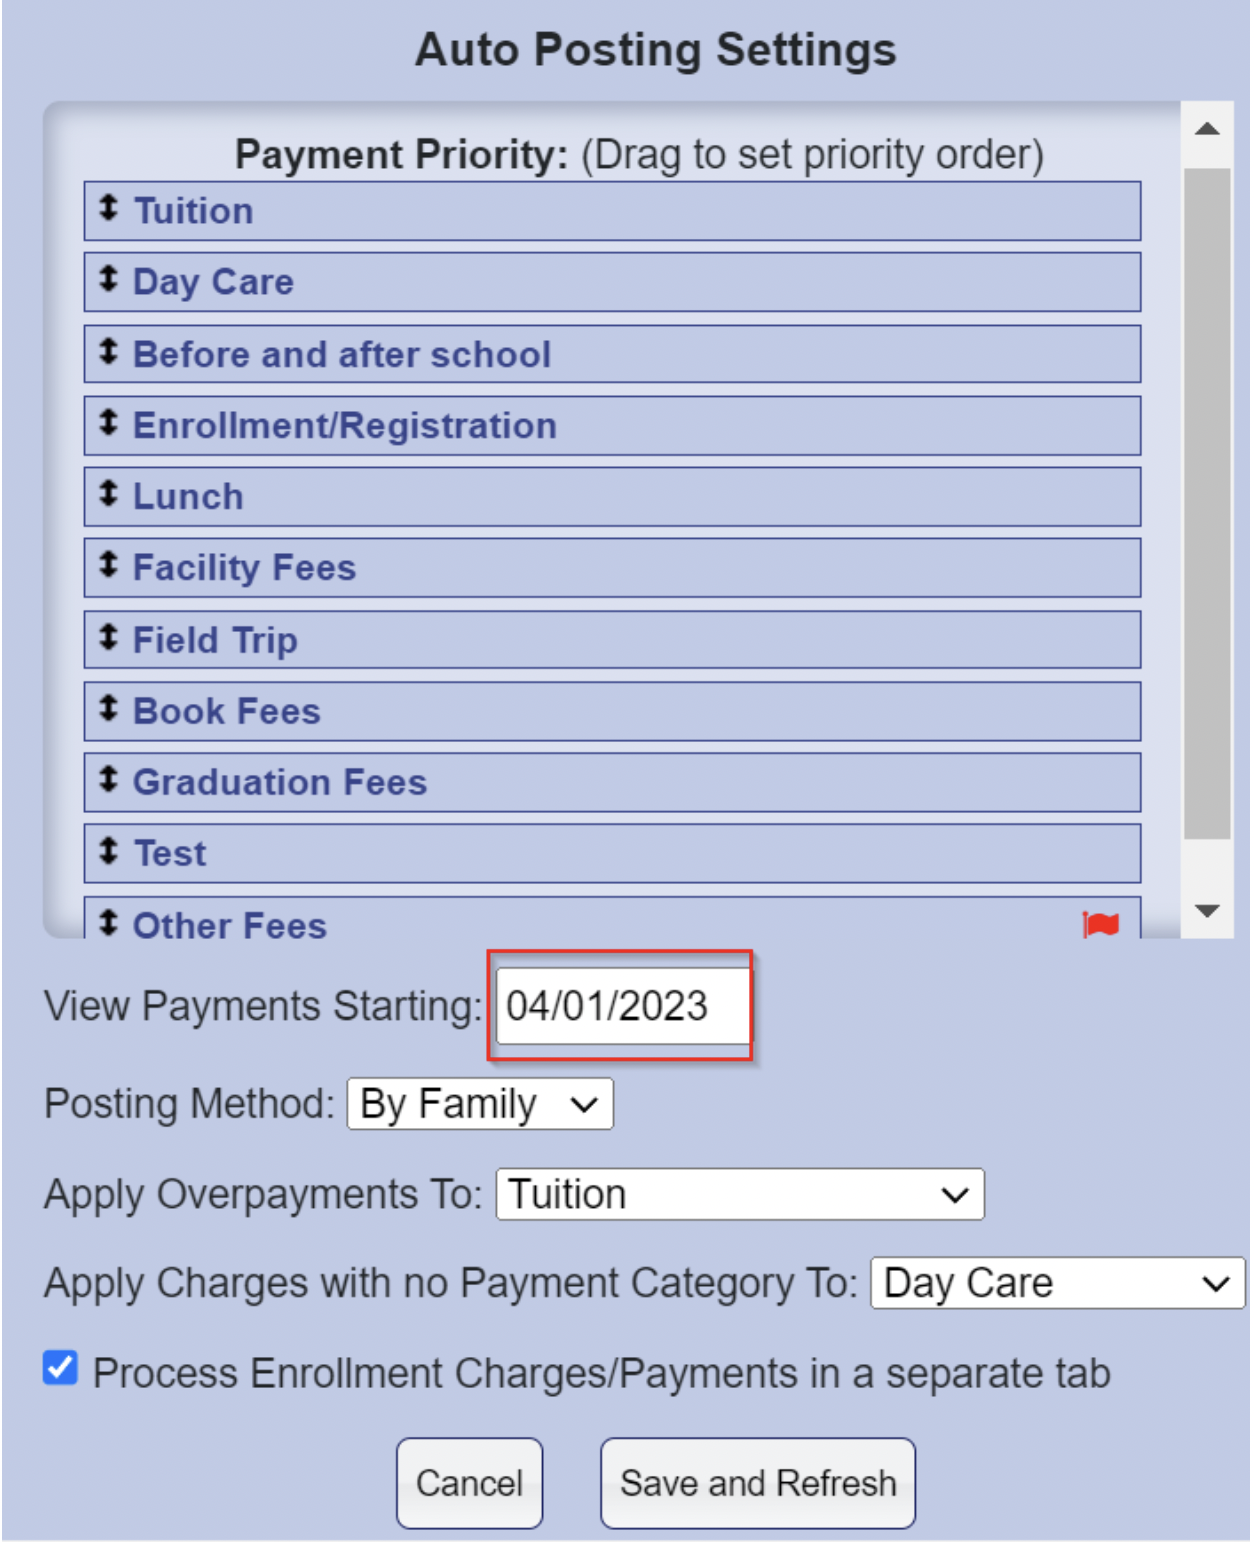
A Settings window appears showing the billing categories currently in use. A red flag next to a billing category means it has no associated Payment Fee Types. Click, hold, and drag the billing category into the desired position to determine the AutoPost payment allocation's priority, with the first item on the list having the highest priority.

After setting billing category priority, indicate a starting date for the payments.
Only settled payments appear in AutoPost. The payment date is when the parent made the payment, not the date the payment settled.
The Payment Starting date should be after the most recently posted payment. Please remember that if a payment appears in AutoPost which you’ve already posted, it can be ignored or hidden.
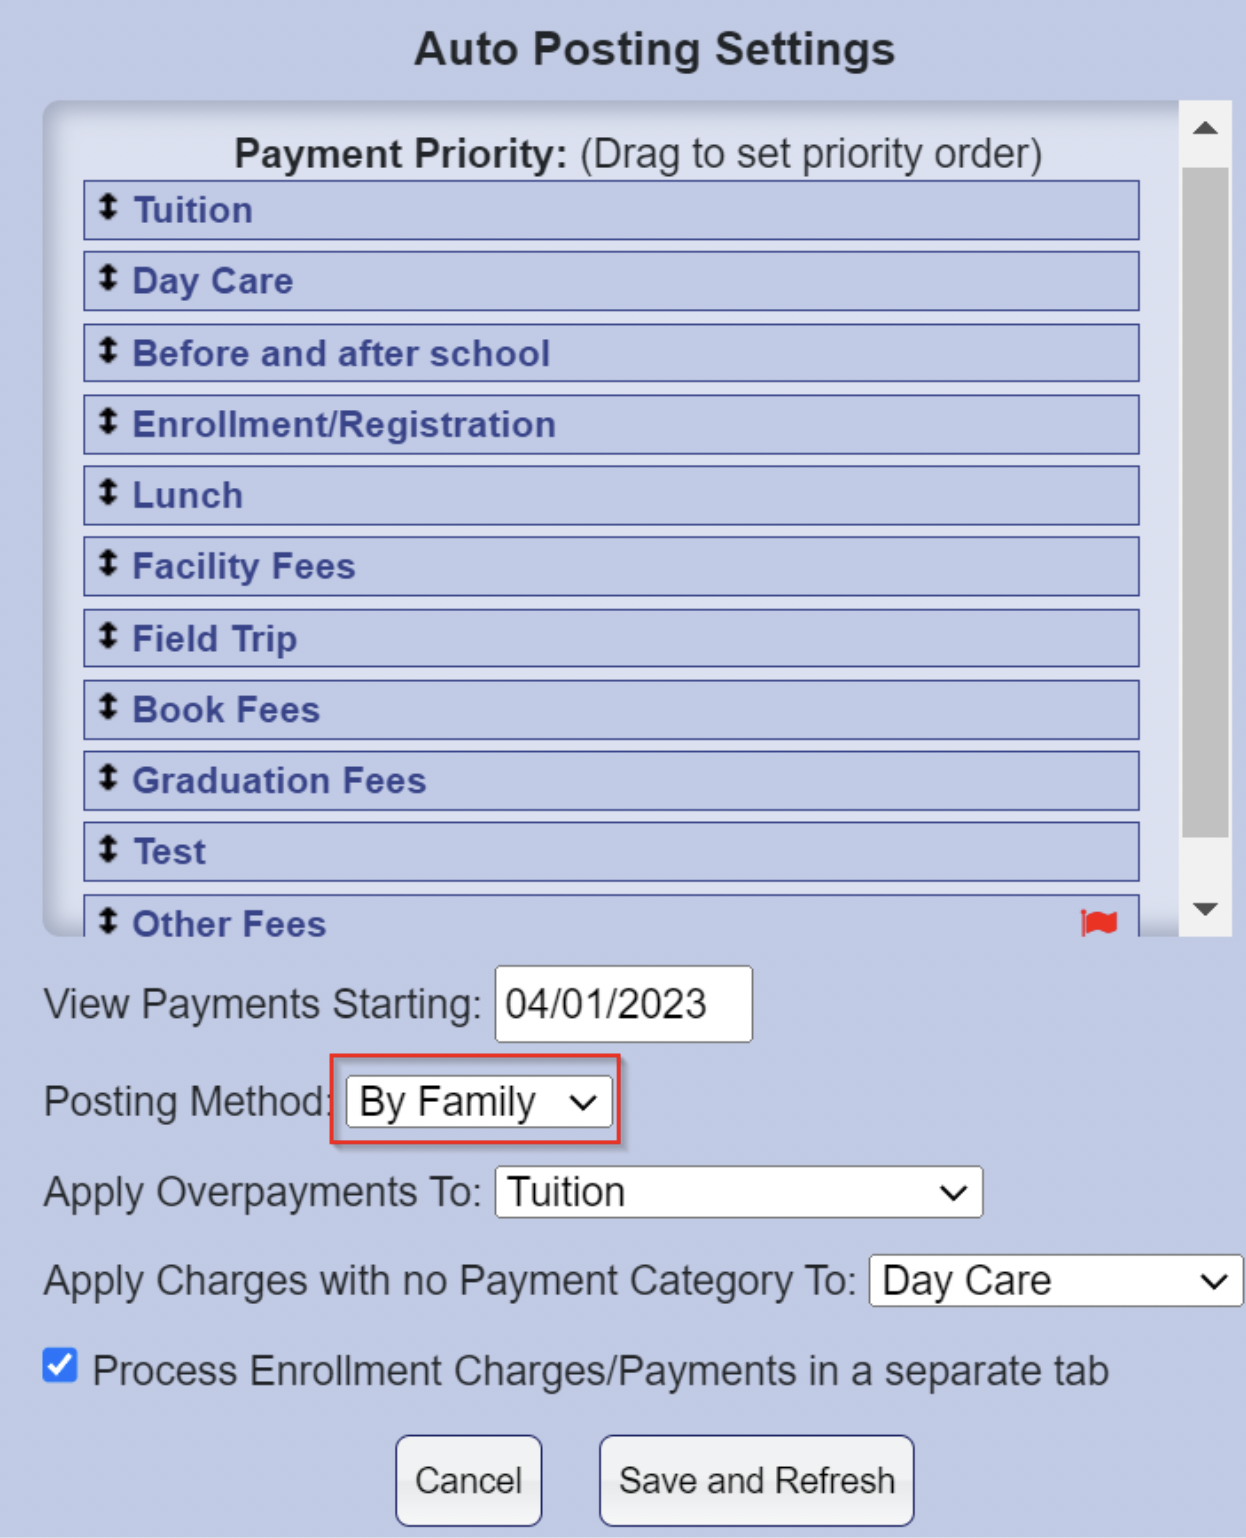
Choose a Posting Method:
By Student - allocates payment only to the student account from which the payment was made. If "By Student" is selected, each family will need to pay the fees for each student separately.
By Family – the school administrator can choose to which sibling payments should be allocated even if a sibling has a zero balance. This method is the most common.
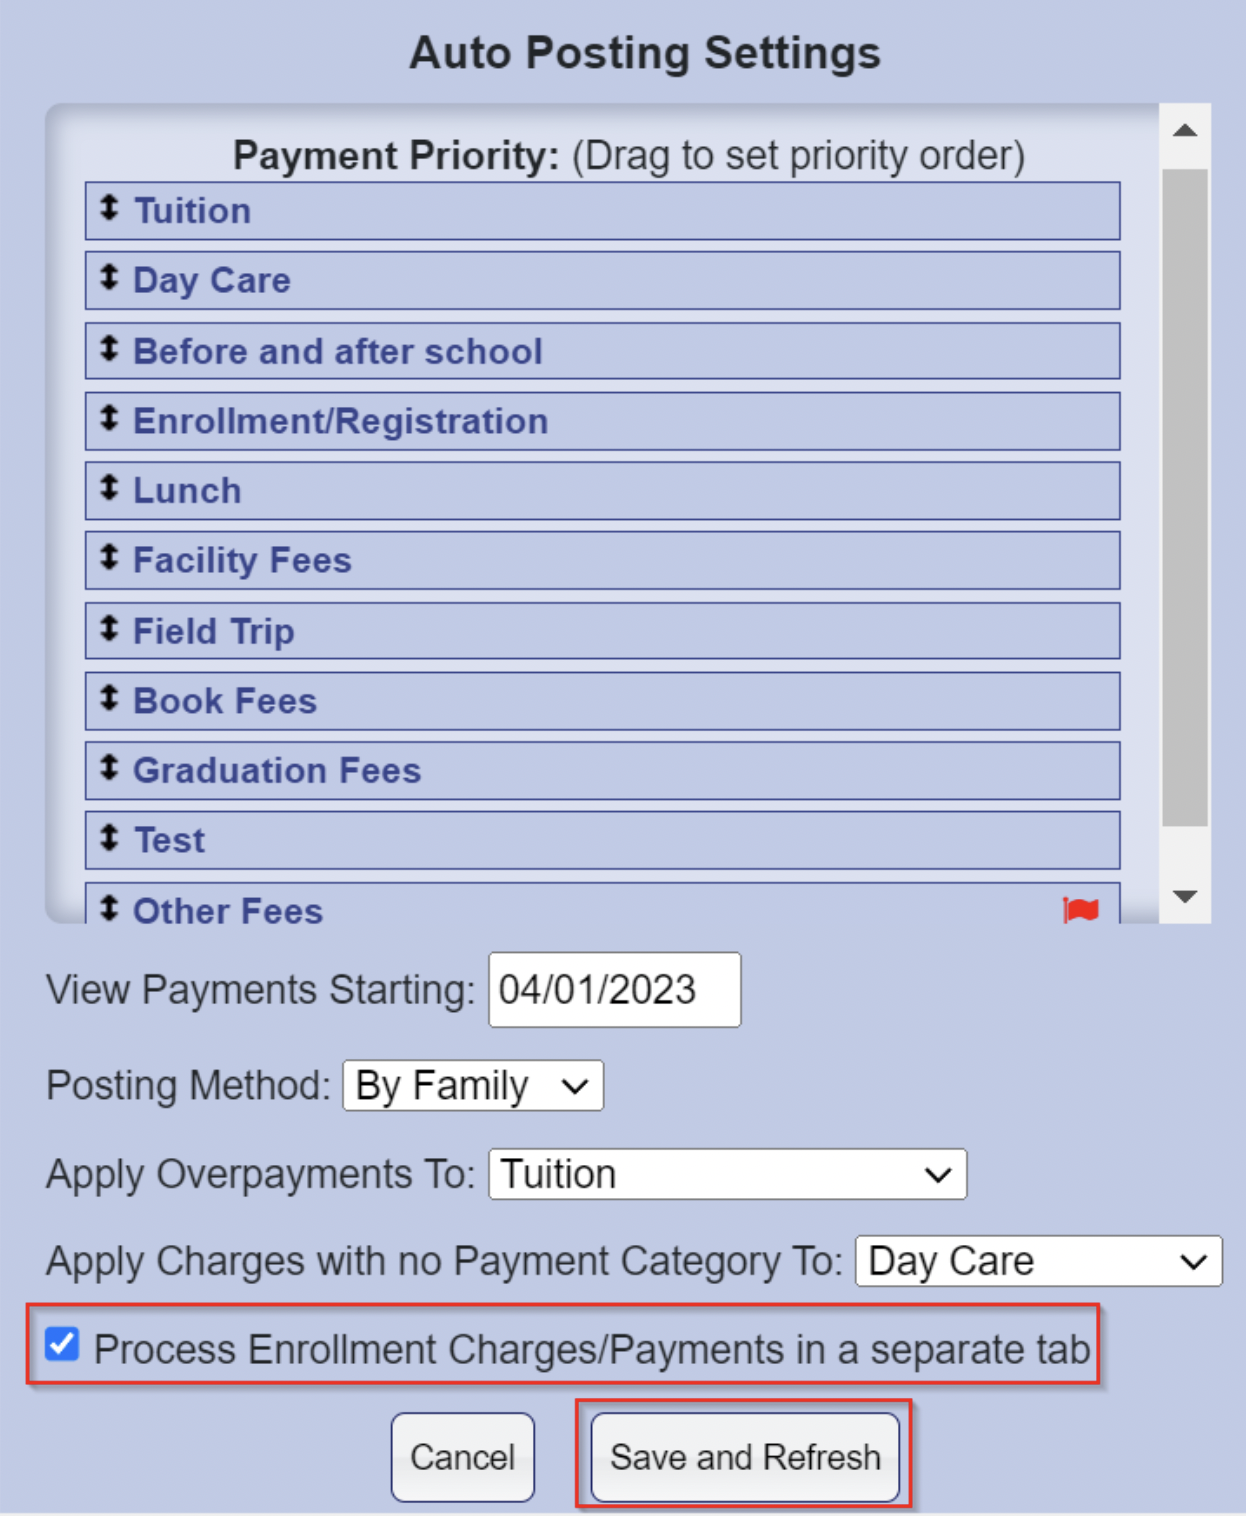
Choose the billing category to which overpayments should be applied. Choose a billing category to which charges with no Payment Type should be applied.

If your school uses EnrollMe you can collect registration or enrollment fee payments during the enrollment process. Since these fees typically apply to the upcoming school year instead of the present one, checking the box next to “Process Enrollment Charges/Payments in a separate tab” allows these fee payments to be processed separately and applied to the upcoming school year.
Now, click on the Save and Refresh button.
Once the Auto Posting Settings are chosen and saved, AutoPost shows any settled payments made via Gradelink Payments (PaySimple), outstanding balances due, and the allocation of these payments based on ledger charges. These suggested payments can be posted to ledgers as is or adjusted prior to posting them.
POST PAYMENTS GRID
The Payment Date / Family/Payments column displays parent and student names. Below the family name, you can see the payment date and amount. If more than one payment is displayed, the amounts get totaled.
If a payment has a purpose indicated, it can be seen by hovering over the amount.
To ignore or hide a payment click the green line through circle icon next to the payment amount. You may wish to ignore payments such as those already posted to the student ledger, or payments not meant for a specific student, like donations or spirit store purchases.
When the setting "Process Enrollment Charges/Payments in a separate tab" is enabled, the "Post Payments" tab will, by default, show only non-enrollment changes and non-EnrollMe payments. Checking the box next to "Show all Charges/Payments" will display all charges and payments.

The Billing Category Balances column shows current charges for each student.

In the Ledger Entries to Review/Post column, AutoPost displays suggested payment allocations. Each suggested ledger payment type may be changed by clicking the down arrow. Clicking on the green minus icon removes the suggested payment. Clicking a green arrow or green plus sign allows you to choose another payment type to add.
You may change the amount allocated to each payment type.
NOTE: The total payment amount in the Payment Date / Family/Payments column and the total in the Ledger Entries To Review/Post column must match for payments to post to the student ledger.
To post the payments to ledgers and confirm your agreement with the payment allocation, check the box in the Ready To Post column and click the Post Ledger Entries button. Use the "Memo" field to indicate pertinent information about the payments. Memos will appear on the student ledgers as well as student or family statements.

ENROLLME PAYMENTS GRID
The EnrollMe Payments grid works the same way as the Post Payments grid.

If “Process Enrollment Charges/Payments in a separate tab” is enabled in AutoPost Settings and you have configured a billing category that contains the text "EnrollMe" or "Enrollment" in the billing category name, then AutoPost will separate the Enrollment charges and payments into a separate tab called "EnrollMe Payments".
As an example, if you use a “Registration” billing category for registration fees, the billing category should be titled “Enrollment/Registration.” This can be changed by going to Admin > Coding > 33. Financial - Billing Category and adding “Enrollment/Registration” to the Registration billing category.

In Financial > Admin > Fees/Types, change the billing category of any registration fee types to billing category “Enrollment/Registration.”
Only charges from billing categories including "Enrollment" appear in the EnrollMe Payments grid.
HISTORY GRID
The History Grid displays every payment that has been posted to a ledger as well as any ignored or hidden payments.
To undo the payment posting or to un-hide the hidden payment, click the circle arrow icon in the Undo Posts column. By doing this, you will automatically remove the payment from the student ledgers and move the payment amount back to the Post Payments or EnrollMe Payments grid.

While in the History Grid, if you cannot find a payment that was posted on the current date in Post Payments, enter the following date as the end date in the Date Posted field. History of AutoPost will only show payments that were applied up until the early morning hours of the current date. Therefore, entering an end date of the following day will search for the current day's posts.
Please remember if you have any questions or comments about Gradelink's AutoPost feature, contact Gradelink Support at 800-742-3083, option 2, or send an email to service@gradelink.com.